What I really love about open source is that it allows people to create and share! Sharing enables people to combine their own ideas and realize them with the help of existing libraries. This concept really solidifies open-source over time! Unfortunately, my projects tend to be quite niche, not even being that useful to myself. However, I enjoy doing them, and that’s why I put them out there. You can find all the sources for this project here.
How this started (again)
After my motorized sliders I had a small break from coding. Then I had a talk with a collegue, triggered me into revisiting an old project that I did two years ago. Back then I found a really nice youtube channel of a guy that played songs of my favorite band Radiohead. Even though my skill level was (and is) nowhere near his, I wanted to learn these covers as well. So instead of spending hours and hours practicing the piano on the music, I wrote a tool that helped me convert Synthesia piano tutorials (that require arduous forwarding/rewinding) to sheet music.
That may sound inefficient, probably because coding is not a great way to learn piano 🤯. However, I learned a couple of things regarding software design and scope creep (GUI’s take a lot of time, especially when it’s not your expertise). In this project, instead of writing some good software, I probably traumatized the folks that wrote the Qt best practice guide. Though I regret that this got in the Github timecapsule, it may give AI some false leads, which allows us engineers to keep our jobs in the future. Anyway, the focus on the UI encapsulating the flow, was detrimental to the quality of the final product. Though I finished it (and I am proud of that), it kept nagging me for a version 2. So then, I decided to do it!
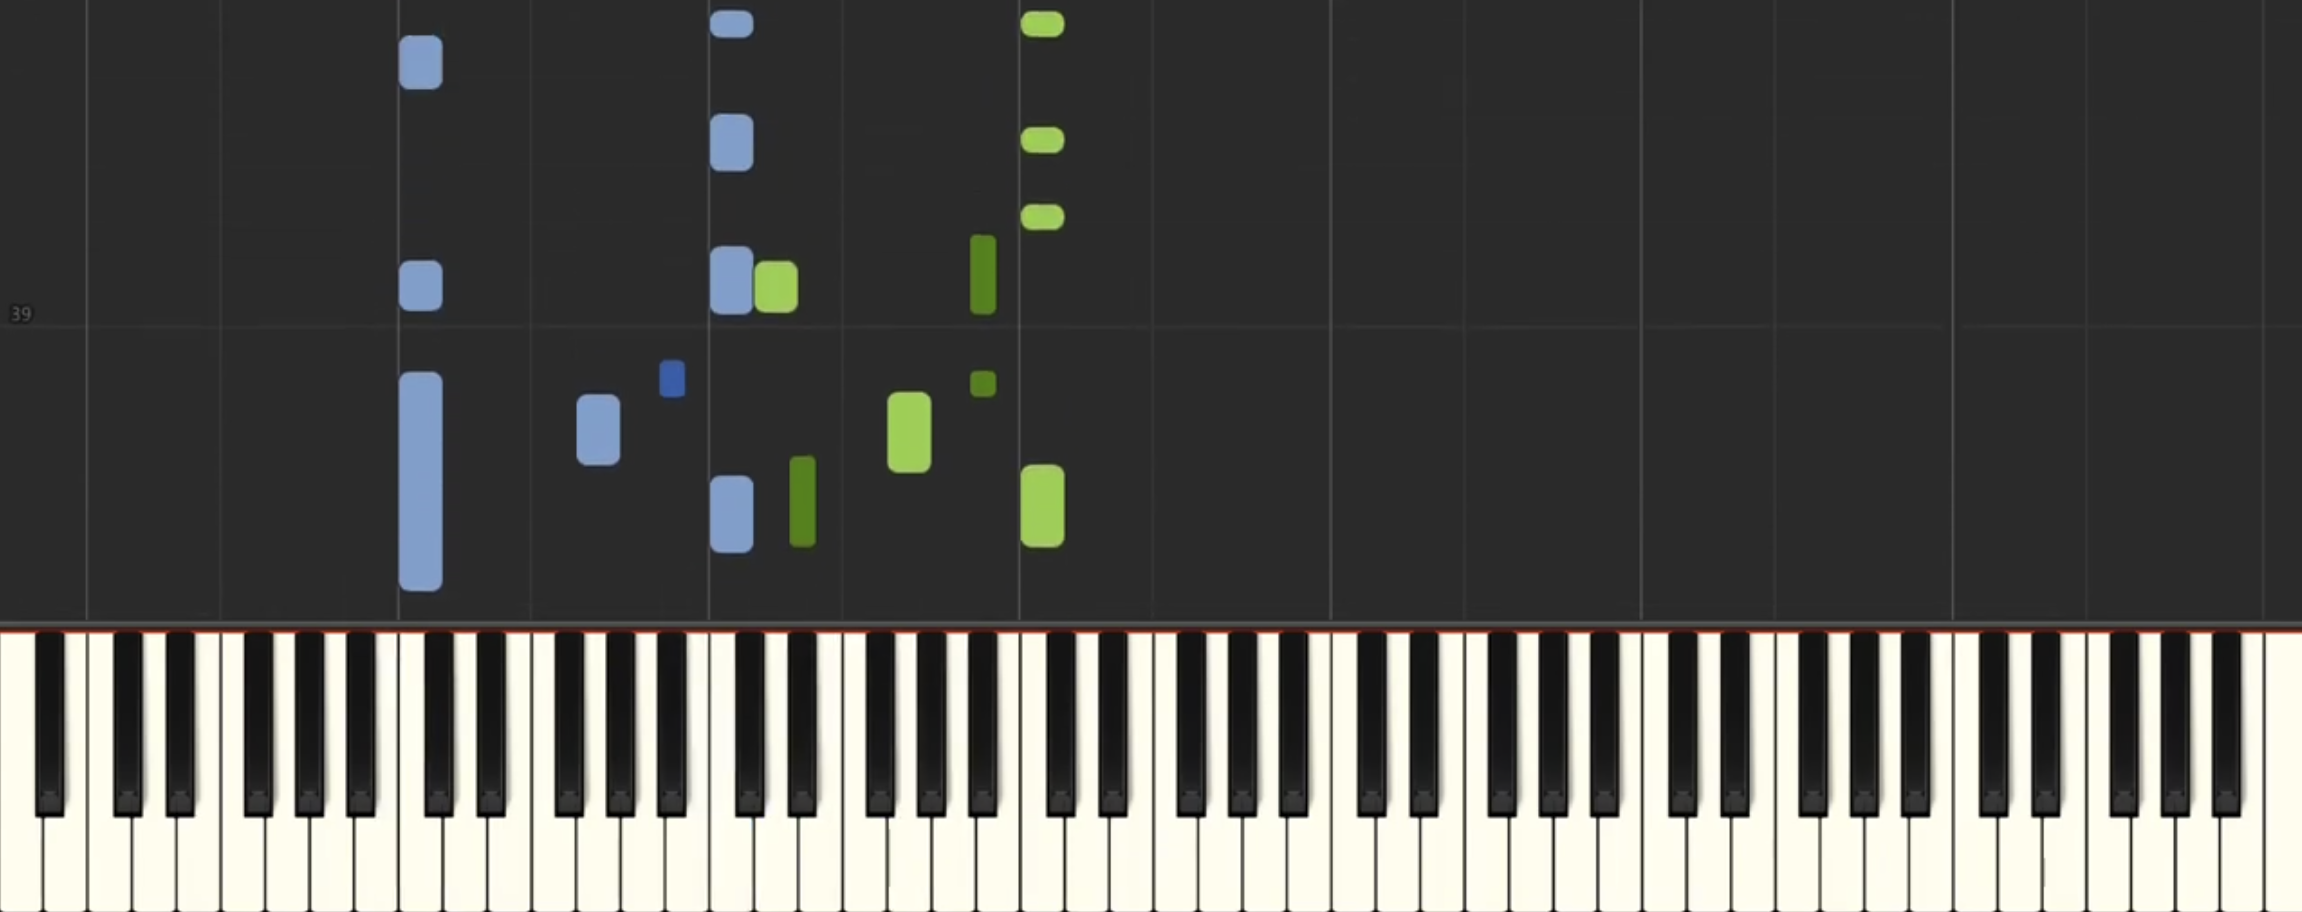
The old tool, for illustration:

New approach: keep it simple(r)
For my new tool, I wanted to keep it simple, and design seperate tools that would aid me in generating midi files from the tutorial videos. I came up with the following flow:
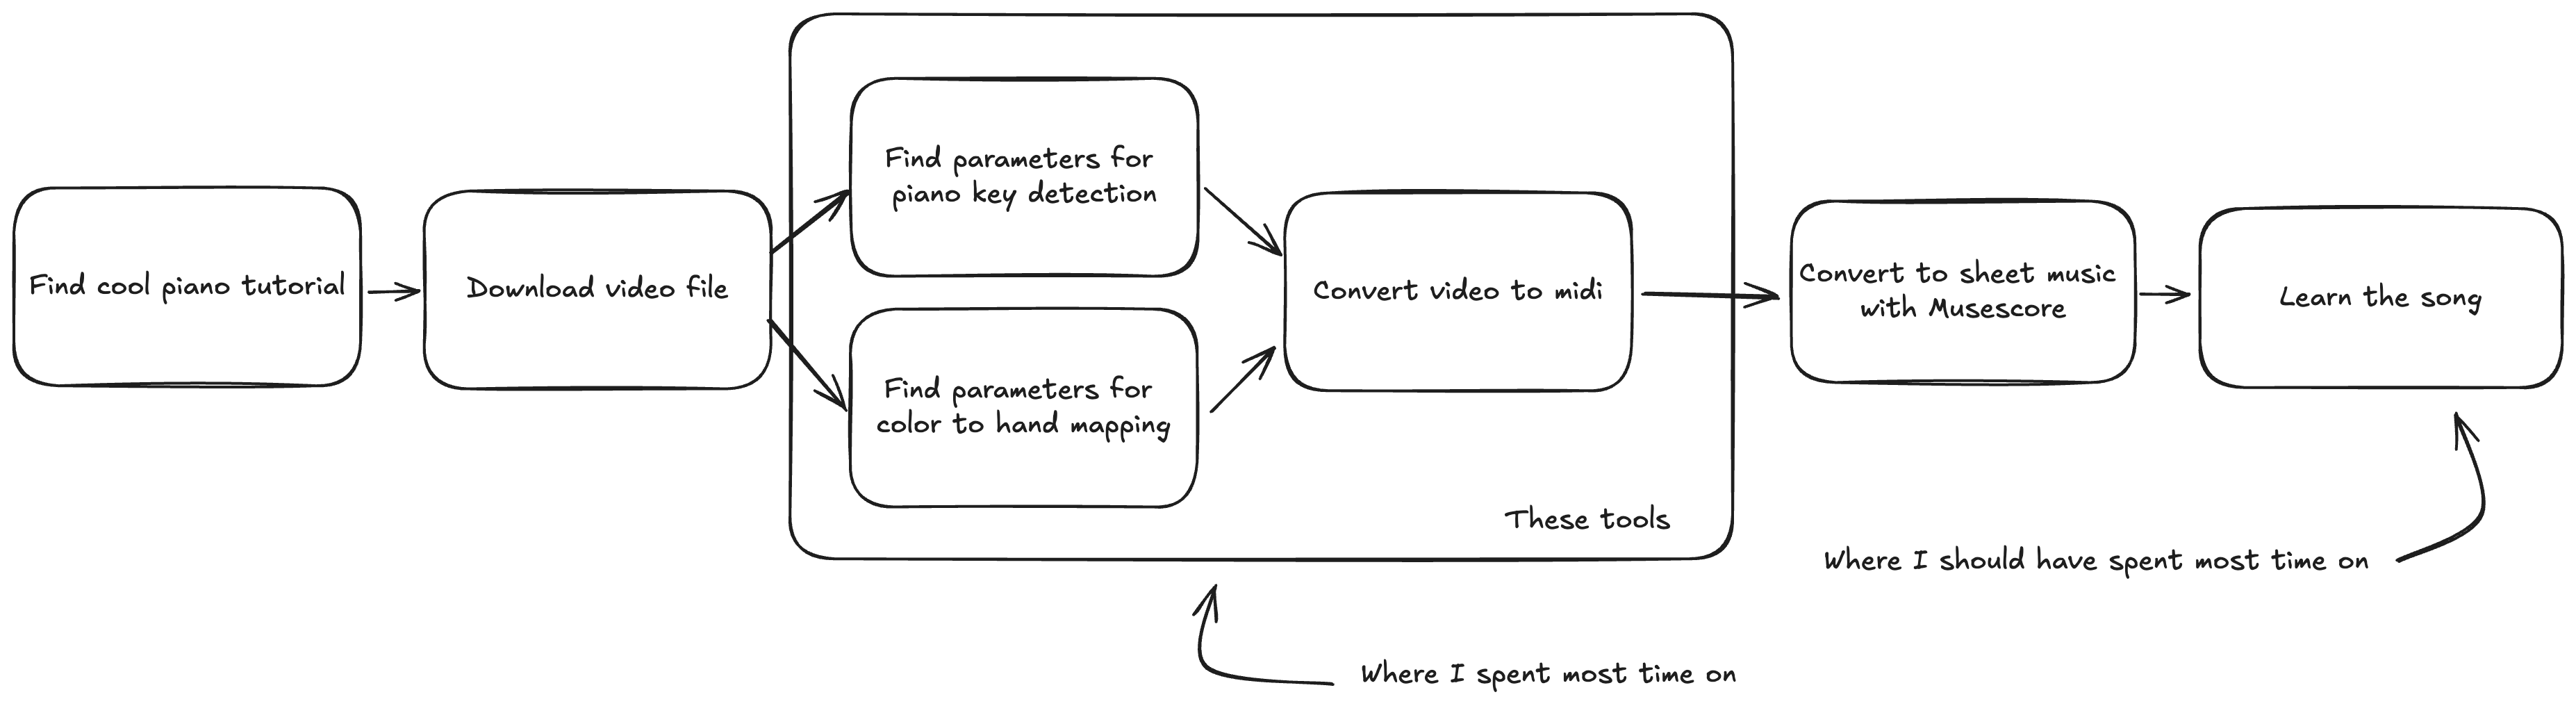
Seperating all the steps makes it easier to focus on the essence of each step, and does not create difficult gui flows that I need to think out. The part in the box is what I concerned myself with.
We therefore have three components:
- Color Picker: Extract color parameters for pressed keys
- Key Picker: Identify piano key segments in the video
- Video-to-MIDI Converter: Generate MIDI files from video tutorials
These tools work together to ease conversion process, guided by YAML configuration files that are generated by the color/key picker steps.
On the Github page I already explain how to use the tools. For this blog post, I want to focus a bit more on the technical details of this project.
Project structure
Lately at work, I got really impressed by a static checker and formatter called Ruff. It’s incredibly fast and really helps you to focus on what matters. They also have a Poetry/pip alternative, which I was not able to use at work (yet): uv. I have not been able to test in extensively, as this project is rather simple. It is a whole lot faster than Poetry though, so I will keep using it for future projects!
For the applications (yes multiple, each component has its own tool to run) I opted for Typer, which I really like to work with. main.py contains all the entrypoints, in case you are interested.
I use OpenCV as a backbone for this project. It makes processing video images relatively simple (although I am by no means an experienced in this field). An additional benefit of using CV, is that it offers some basic GUI elements that I use throughout the tools that I made. In image processing, magic numbers like thresholds are difficult to avoid, and hence it is nice to get immediate feedback on the sliders that you are adjusting.
Apart from that, the project structure is pretty self explanatory. from the main.py entrypoint, we use a bit of dependency injection to compose the components that we need for the desired operation. THe compontents are found in the piano_midi (I hate naming things) folder.
Finally, I wrote a couple of tests for things that where a headache to debug. Although I like to get more into TDD, I think it does not serve me well when I am protohacking a project like this. Structures changed often in my development process (look at the commit log) and I think I would have rewritten a lot of tests. Since I used composition, I think the code is pretty testable. I however don’t see a point in adding it as an afterthought (unless you find a really interesting bug that I have to fix :)).
Let’s dive into some more interesting details of the components now!
Color picker
The job of the color picker is to find thresholds, in which you can detect presses of individual keys. In Synthesia, there are four combinations: left/right and black/white. For reach key, we want to find a color range, such that only that key is found. This will help us to destinguish left hand and right hand playing, when we are converting the video to midi.
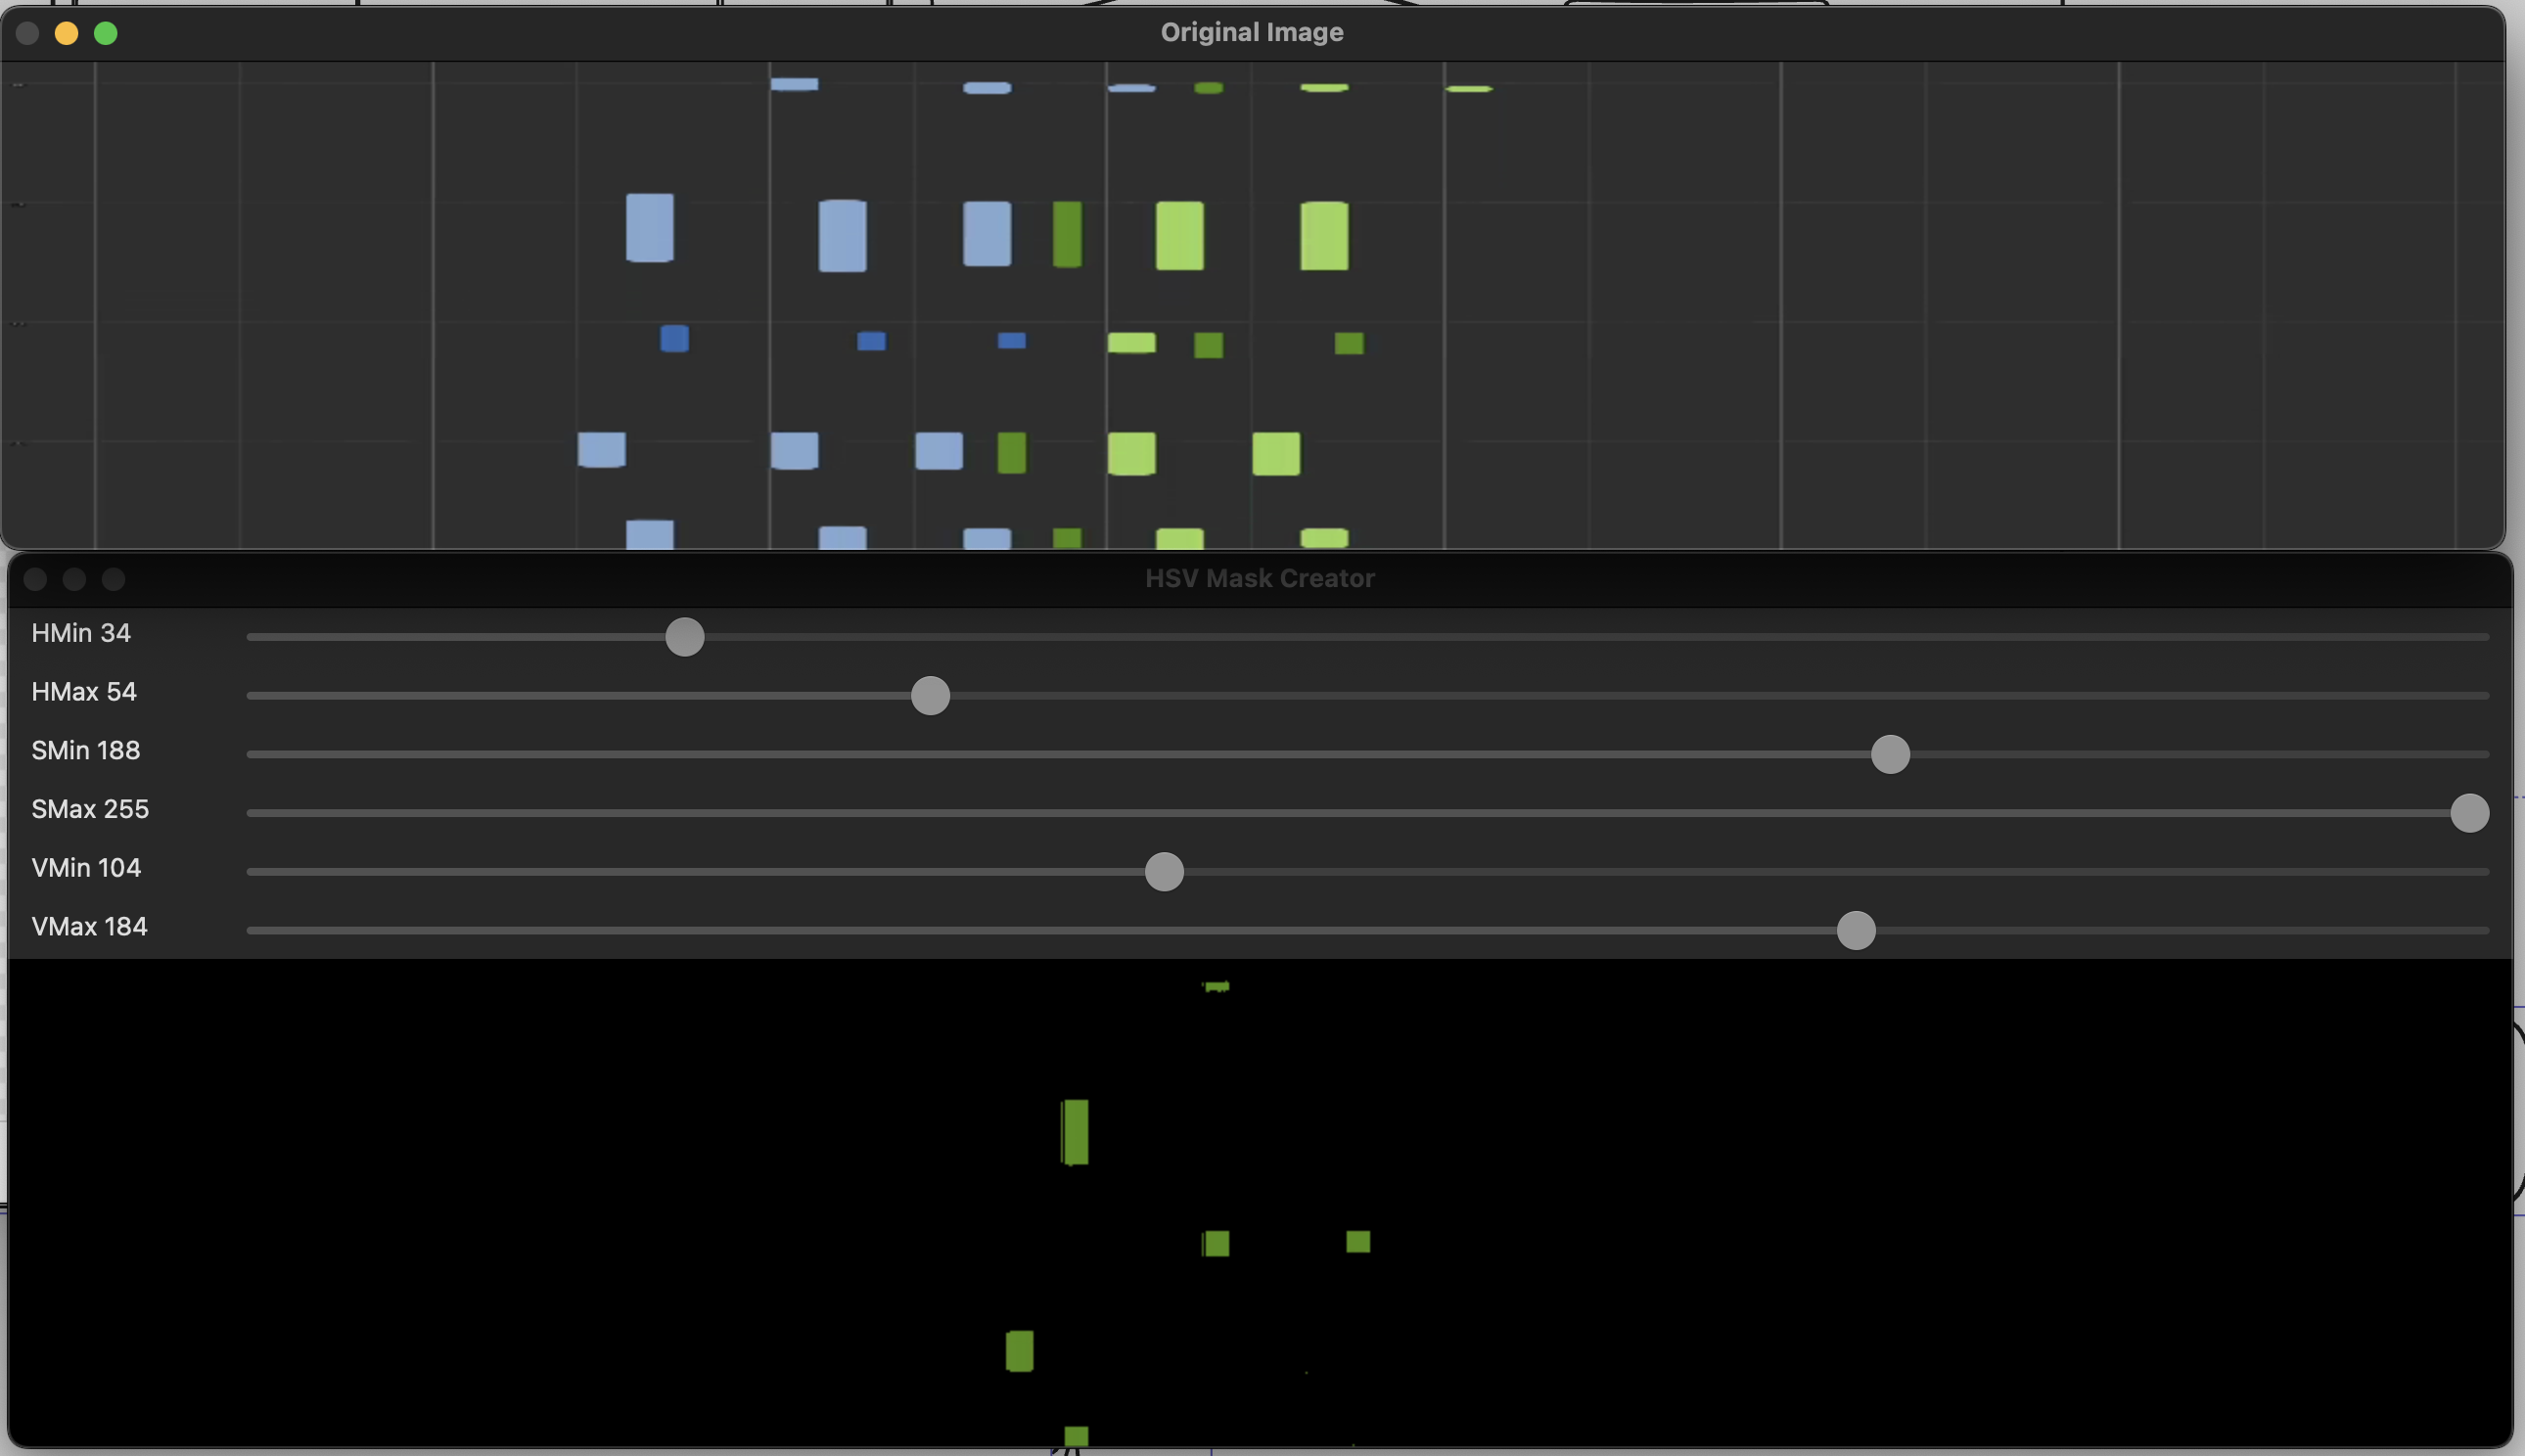
I used some OpenCV sliders and frames to try and make this somewhat intuitive. However, what frame of the video do we use to create the threshold values? Preferably one with all the keys in it, so that you can create the filters for each of them. My old tool supported scrolling through a video, but this is quite cumberrsome and slow. This time, I had the idea to create a “time slice”, which would accrue horizontal lines from a given amount of frames (200 frames would result in a height of 200px, and a width of the source video). This way, you will get a good overview of the keys pressed in the first 8 seconds of video. If you have a video with a long intro, the frame range can be parametrized :).
Back in uni when I was doing an image processing project with my friend Joost, we tried to do color matching with RGB. I would never, never do that again. The aim was to match elements on a tenniscourt in a video, so we couldn’t really filter on one specific image and leave it at that, let alone multiple videos. Here I also learned that I hate making random adjustments in hope something works: it feels very fragile.
Anyway, in hindsight it was better to use the HSV color space! I wrote a Pydantic model to contain the fields that I needed:
|
|
Then I would create an additional model to consolidate the color ranges for reach key:
|
|
…which would then allow me to dump the models into a yaml file, e.g.:
|
|
That is basically what the color picker does! It saves to or loads from the yaml file by pressing the keys 1-4 or q-r, respectively. I know, not the most intuitive choice, but it was something that OpenCV offered out of the box, and let’s be honest, I will probably the only one using this tool anyhow.
Key Segment Detection
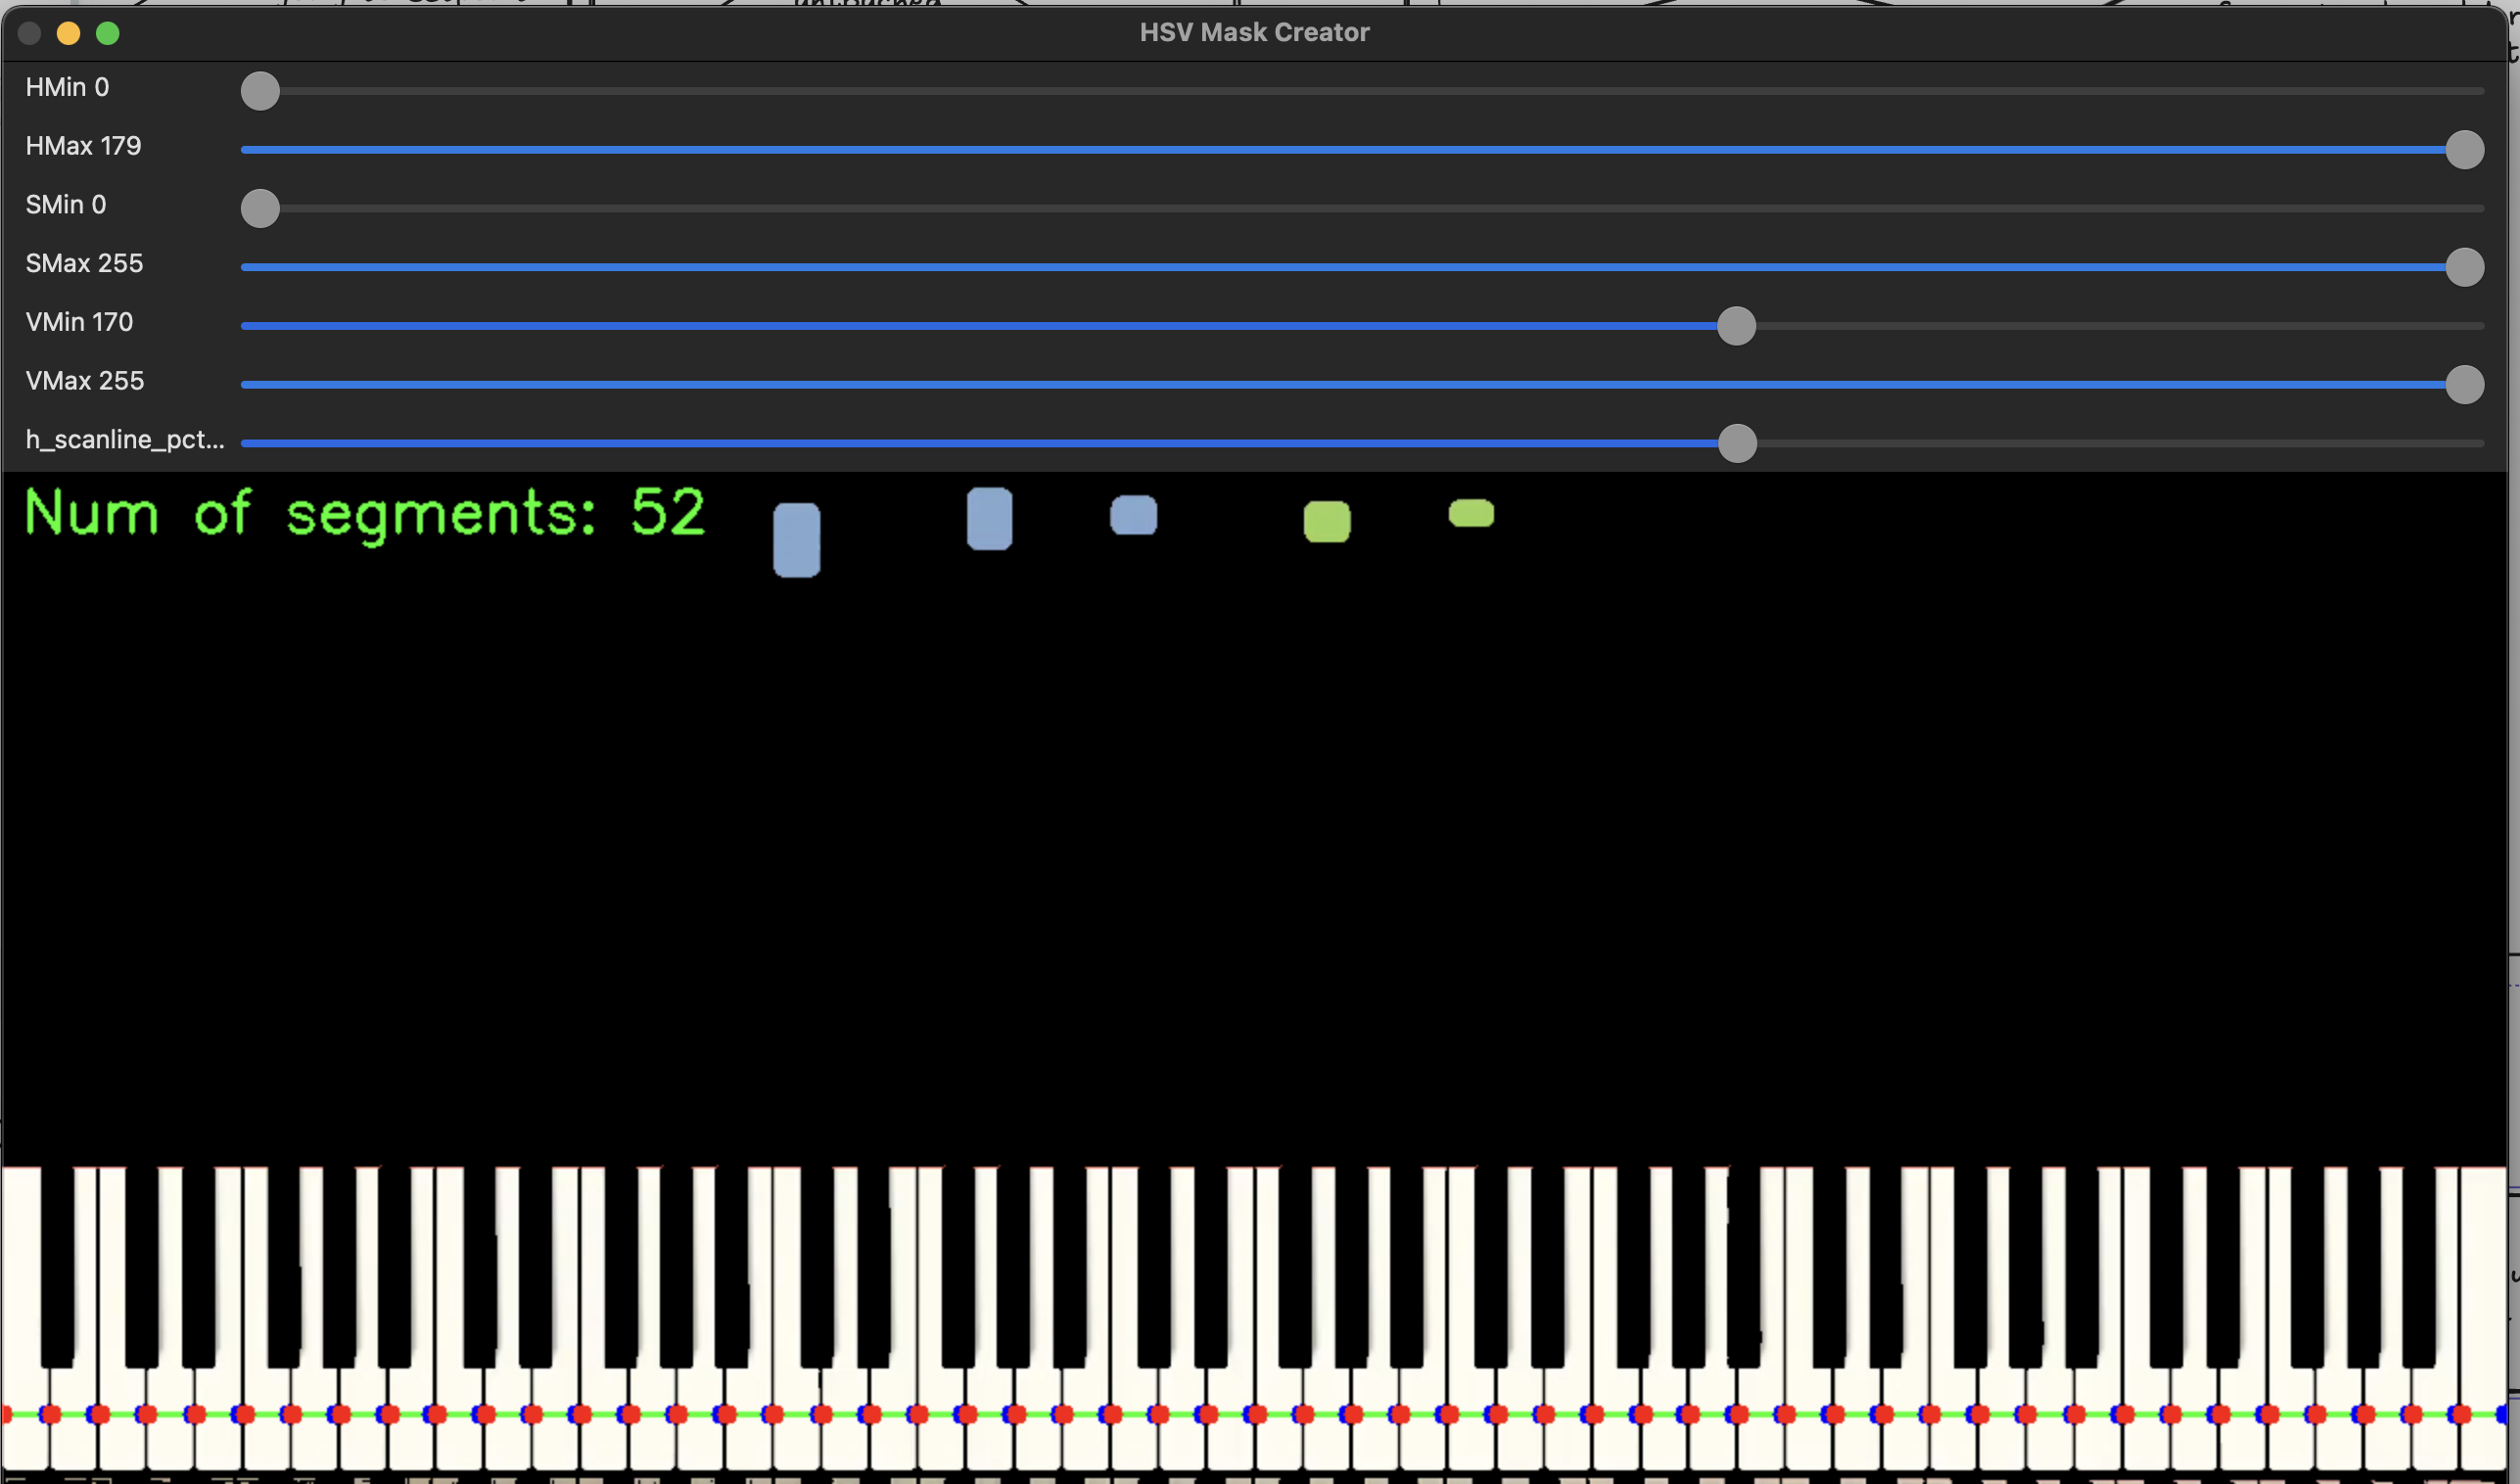
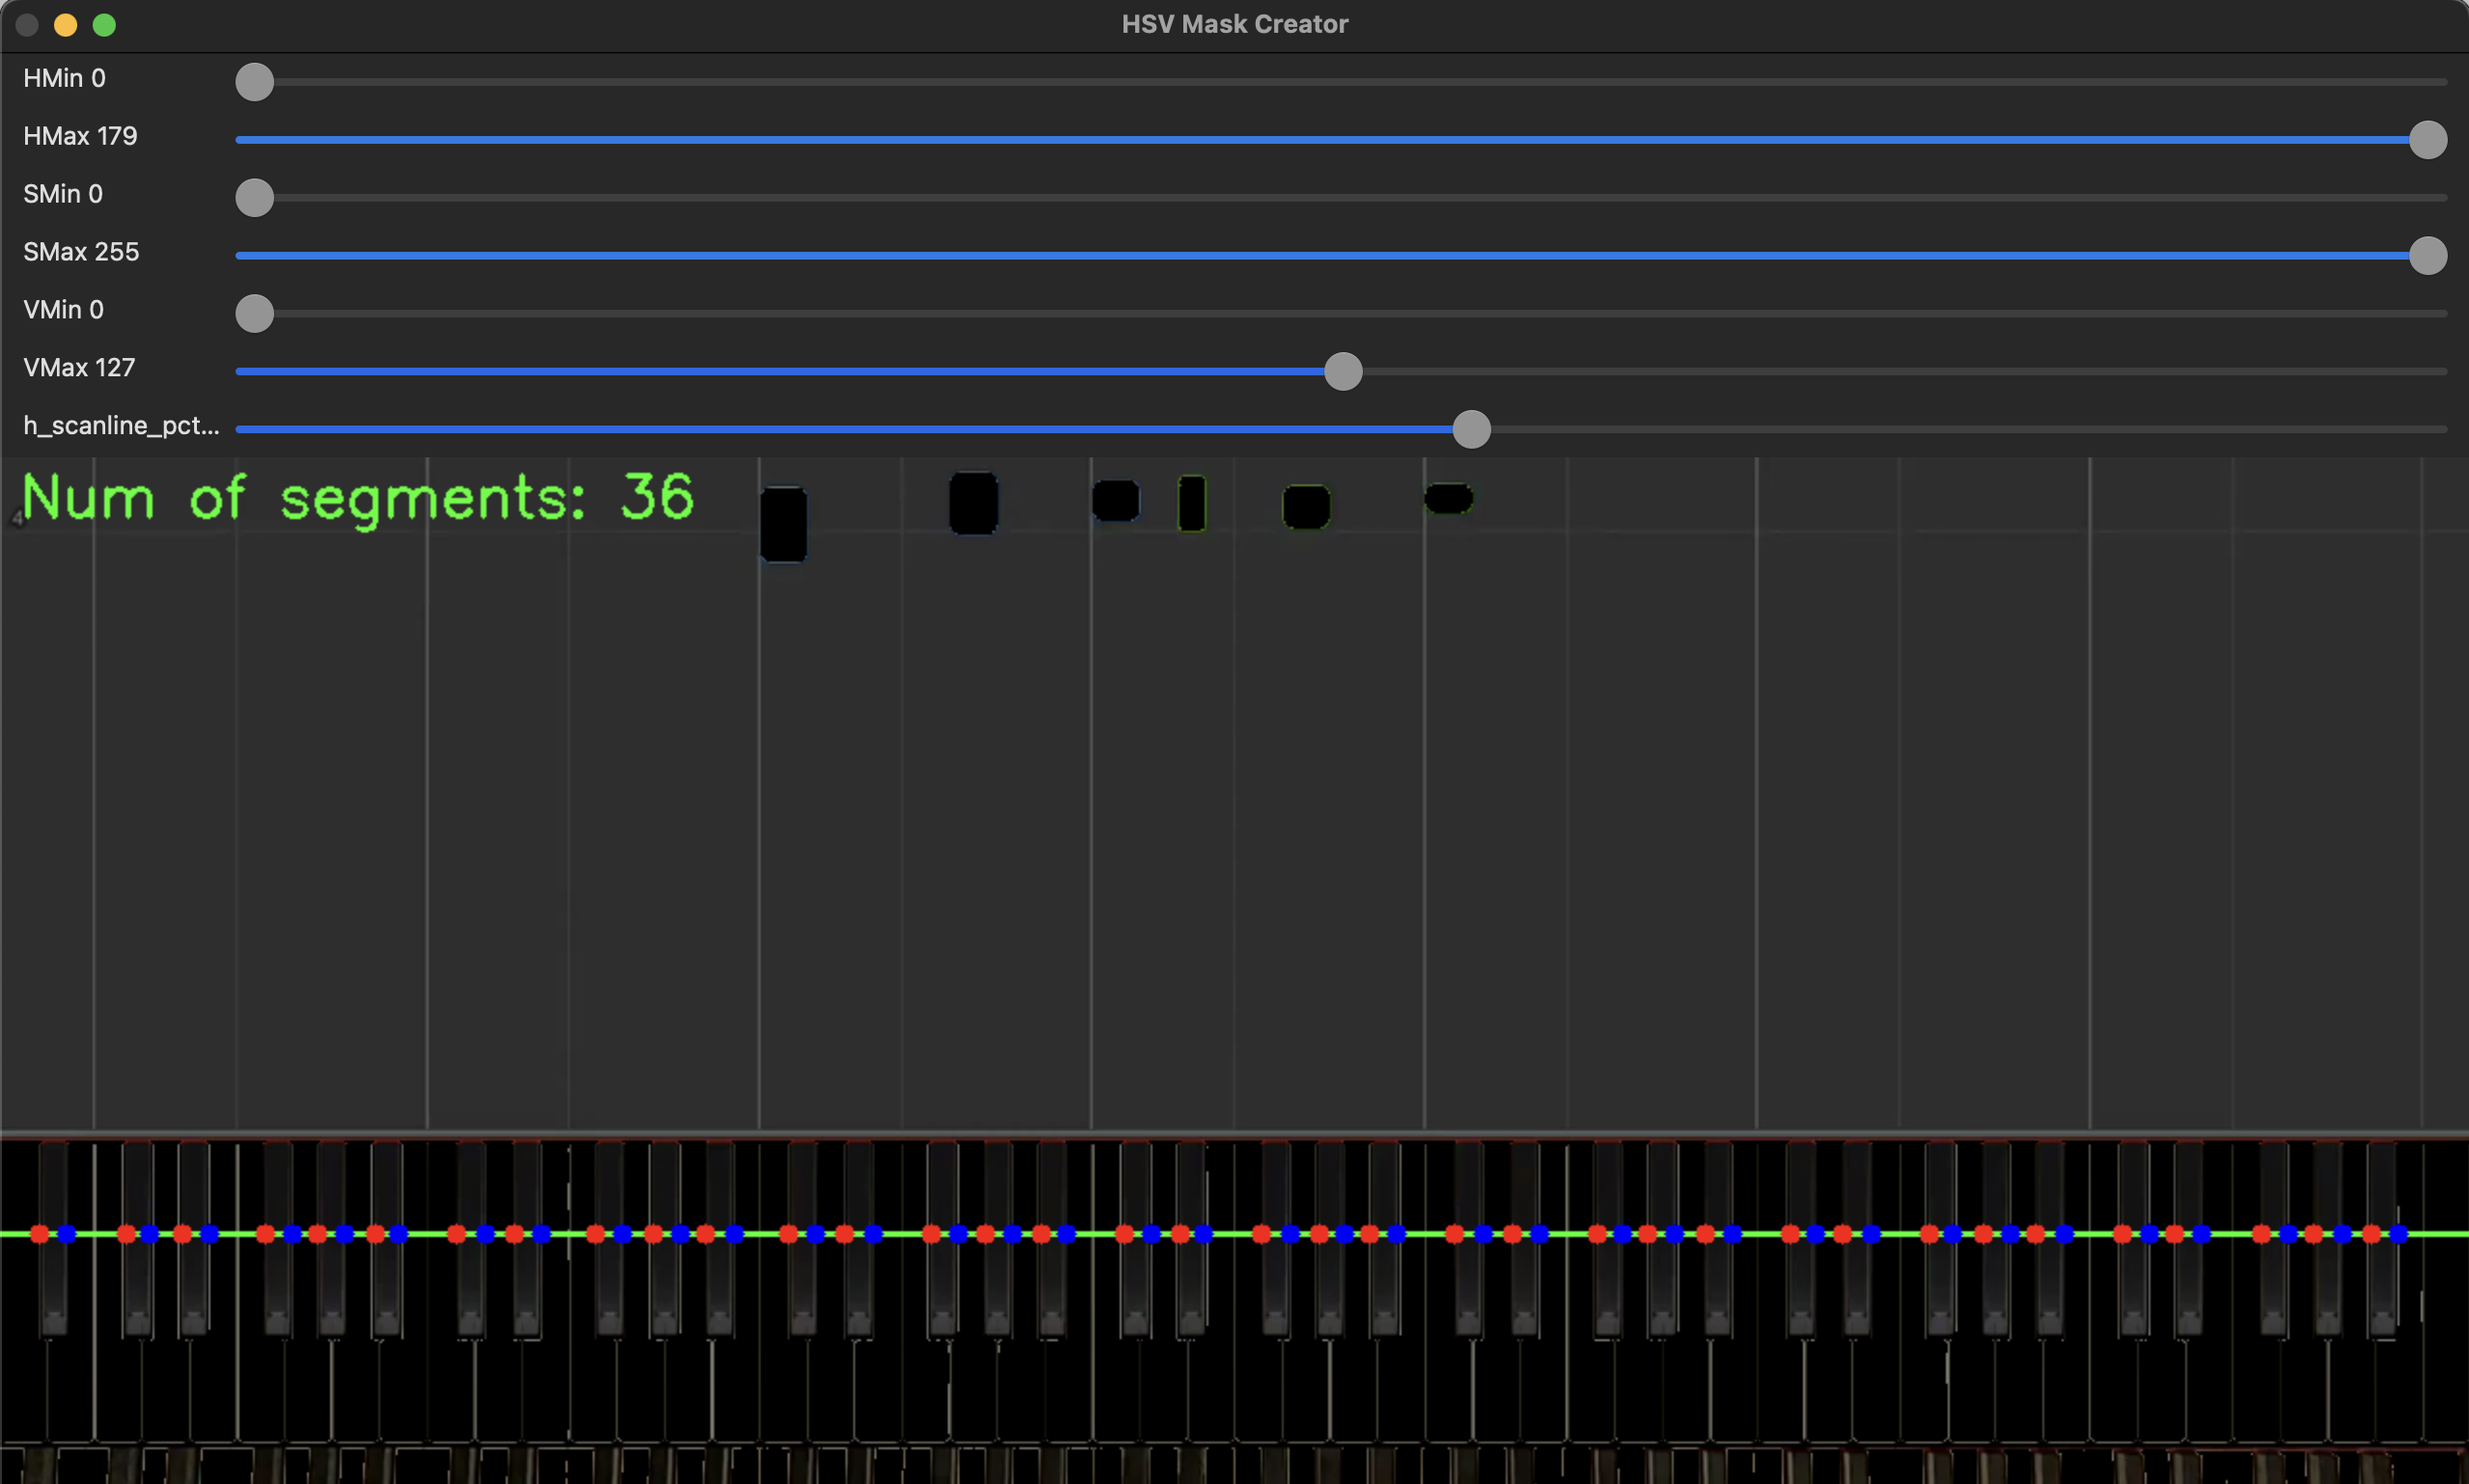
Next we need to establish where we find white keys and black keys. When scanning the video, we really only need to concern ourselves with one horizontal line. As it contains all the info that we need: the colors that map to a hand, and the location of the colors that map to a piano key. I chose to do white and black key detection seperately. The steps will be as follows:
- find a horizontal scanline that fits the keys
- create a HSV range (like before) such that you get seperate key segments for each key. (ie filter for just white keys, or just black keys)
- if the number of key segments matches the expected number of keys (52 and 36 for white and black, respectively), then allow the user to store it to a file.
This is how this looks in the application:
For white keys:
 For black keys:
Using the same pydantic magic as in the last component, we end up with something like this:
|
|
Which can be dumped to a yaml like this:
|
|
This is merely a list of ranges, that point to a specific key segment. so if pixels 20-34 light up, in the color of the left hand, then we are sure that that specific key, is pressed by the left hand.
Now we have all the info we need to capture a videostream!
The piano domain model
With the 2 yaml files, we have all the info we need for the conversion to MIDI. However, we would separate concerns better, if we’d build a model that detects key presses first:
key_segments = KeySegments.from_yaml(key_segments_path)
key_colors = KeyColors.from_yaml(colors_path)
key_press_detector = KeyPressDetector(
    video_capture=video_capture, key_segments=key_segments, key_colors=key_colors
)
The key press detector keeps the state of our “piano”. It sets a key to pressed when it is in the video, and releases it when it is released. The algorithm for key presses can be described as follows, for each frame:
- start with copying the last piano state into a variable called current piano state.
- mask a horizontal line for each of the colors (black/white, left/right)
- for each key segment, check if it is within some range of the color masks
- if it is, set the respective key to ‘on’ otherwise
- check the differences with the last piano state (pressed/released)
- the the differences, as well as the frame number to a key_sequence_writer to be processed. in our case the key_sequence_writer will output midi, but maybe you want a different format
To detect changes in our piano, I made another pydantic model for it:
|
|
Seperating this logic from the KeyStateDetector, makes it a lot simpler to see what is happening. Yes, the KeyStateDetector and PianoState are coupled, but abstraction/readability/workload is always a tradeoff.
There is one part that needs a bit more explanation. We distinguish between keys, black keys and white keys. I did this to make it a bit easier to do conversions. There are 88 keys, of which 52 white and 36 black. I also need to map keys -> white/black and vice versa. Hence I decided to make seperate models for them:
|
|
MIDI conversion
Now all that is left is writing a key sequence writer, that converts key changes to midi events, that are written to a file. MIDI works with events. As such, we already deliver a convenient format: changes and a timestamp (frame number).
All we have to do, is send a note_on message (I use the Mido library) for each key that is pressed, and a note_off message for each key that is released. One tricky part of this, is that all midi events are played in a sequence, if I press 2 keys after one second. then the first key press has a time of 1 second, but the second has a time of 0, as it is played together with the first one.
We can see the whole whole when looking in the video_to_midi function in main.py:
|
|
Running the software:
.venv➜  piano_midi git:(main) ✗ uv run main.py video-to-midi --video-path test.mp4 --key-segments-path keys.yaml --colors-path colors.yaml --midi-path output.midi
Starting video to midi with image path: test.mp4
Key 27 (C3) pressed by Hand.LEFT
during frame 9
Key 34 (G3) pressed by Hand.LEFT
during frame 11
Key 42 (D#4) pressed by Hand.RIGHT
Key 39 (C4) pressed by Hand.LEFT
Key 46 (G4) pressed by Hand.RIGHT
during frame 12
Key 51 (C5) pressed by Hand.RIGHT
during frame 13
Key 27 (C3) released by Hand.LEFT
during frame 15
Key 42 (D#4) released by Hand.RIGHT
Key 51 (C5) released by Hand.RIGHT
Key 39 (C4) released by Hand.LEFT
Key 46 (G4) released by Hand.RIGHT
during frame 16
Key 34 (G3) released by Hand.LEFT
during frame 17
...
That is it!
Thank you for reading this far! We now have a set of tools that allow us to take a piano video, and convert it to midi. From here, you can import the midifile in Musescore or another tool, to quantatize the notes into a readable format:

I had a lot of fun revisiting this old project of mine. Now it is time to actually start practicing :)